We don’t really live on a farm. We have about 40 acres that’s mostly
wooded, where we live with our cats. If cats were a farm animal, then I
guess with 10 cats I’d be considered a farmer! But we do have a chicken
pen, that had chickens in it several years ago. My granddaughter, who
just turned 5, decided that she wanted chickens for her birthday in
February and they had to be live, so we now have chickens again. I took
this picture the day after her birthday and knew that she would have to
have a layout associated with it.
This layout is a mix of different cartridges and layers all put
together as a backdrop for my picture. I decided that since the layers
would be a mix of patterns, I would go with a solid piece of kraft paper
for the base. Then I went through my paper stash and found two
different sheets of paper that had chickens on them. I went through
again and found some prints that matched the color scheme.
I knew that I wanted a quilted look as the main frame around the
picture so after a little searching, I found a doily in the Martha
Stewart Elegant Cakes cartridge that I like. I picked doily 1 and sized
it to 9.403 width and 9.417 height in the Cricut Craft Room. I used the
hide contour and removed everything inside the doily except for the hole
in the middle and the holes along the border. Then I cut both pieces of
the chicken paper at 6×12 and put them on the cutting mat horizontally.
After it was cut, I used my paper trimmer and cut them into slices
resembling a pie.
The next cut uses the Mini Books cartridge and I picked HrztIL 13 for
it. I went to the hide contour feature and hid the holes on it. It was
cut at 7.5 width and 9 high.
This is a piece that I cut out for a starting point to design around.
It’s just cut with a paper trimmer and then I used a corner punch to
round the edges. It goes down first on the paper.
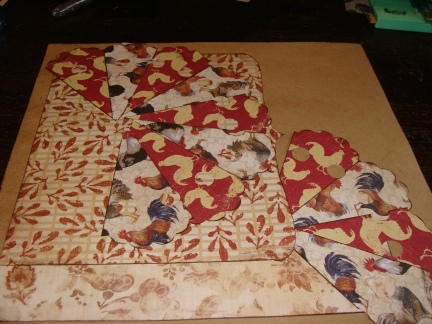
Next I placed 3 of the cut fan blocks so that they fan out.
Next is the piece cut from Mini Books.
The next part involves placing your fan block pieces where your photo
is going to sit. You will notice that they don’t match up at the
bottom, but that’s ok because your picture will hide that!
I mounted the picture on a dark brown mat then positioned it on the blocks.
Now we come to the Folk Art cartridge! I went to the border section
and picked one that looked like rick rack called Hen and sized it to
10.5 width and 2.5 high. I cut it with a light cream cardstock. I placed
it under the photo on the printed paper.
Next I started working on the title. I used Country Life and picked
the phrase Farm Raised. I put it directly on the CCR mat with no
additional sizing. It sizes at 4.222 width and 2.5 height automatically
which is about the size I wanted. Next I went to the basic section and
found the 2 chickens. I dragged them onto the mat and kept them at the
default size. I placed the first one and welded it onto the F and kept
the 2nd one the same size as well. I welded it onto the M and D. I cut
it on dark brown cardstock. Making the shadow was not too hard since I
had not resized the images. I just chose the phrase shadow and then the
chicken images and welded everything together. I cut it from the same
cream cardstock that I had used for the rick rack border.
I attached the pieces together and used pop dots to raise them off the paper. I then placed it on the border strip.
For the final piece on this layout, I used a couple of my Prima flowers
and attached them along the side of my picture where you see the gap
between the fanned out images and the paper.
A close up of how the fan blocks look after the picture is mounted.
*Tip: I used Tim Holtz Distress Ink and inked all of the pieces of
the layers to add some definition and make them stand out better.
I really think that this was a fun layout to plan and I was able to
use several different cartridges and make all the page elements myself.
This layout is also featured on the CricutDIVA design team blog! You can find it at
http://cricutdivablog.wordpress.com/ Come check us out and see everyone's amazing work!!


